#08 - Mt. Moon
So here we are, fresh after our first gym battle! Things are going to start opening up more in this next section, Radical Red lets you really stretch your legs before taking on Misty, to the point where you can access a lot of the stuff leading into Lt. Surge without even obtaining your second badge. You can't go completely out of order as far as I'm aware, but you'll see as we progress.


A scientist guy gives us a dynamax band and some wish stuff, but we won't really get to make much use of those. What's more exciting is new encounters!
On this route we can catch both Nidoran forms, which we can immediately progress to Nidorino and Nidorina. Last time I had a stock of Moon Stones to immediately turn them into Nidoking and Nidoqueen, but I forgot I'm not using the care packages cheat this run, so they will unfortunately have to go into the box before I can evolve them.

Sorry fellas, not yet.
Our next documented encounter is Lass Sally in route 3, I at first thought this was Lass Sally but it's actually someone else. I'm going to save state a bit in case I accidentally run into Lass Sally before I'm ready to document.
Alright I think this is her. I'm going to save state to check.

Ok not her, someone else.

Ok yep it's her, prep time.
Let's see what we're working with here.

Pikachu-Flying (Pikachu gets a lot of variants in this game including some with secondary typings, this one is Electric/Flying), special attacker with base 90 speed, it's going to hit wicked hard with that Light Ball doubling its attacking stats. A strong super-effective hit should down it though, I'm going to tentatively say Angela leads with Rock Tomb or something.
Oricorio-Sensu is the Ghost one, an even speedier special attacker, but Angela still outspeeds and can hit another Rock Tomb or can try for Sucker Punch (Rock Tomb is probably preferable). Whimsicott is rather bulky but attacks on the special side, of Clod can switch in and hit with a 4x effective Poison Tail Whimsicott is probably down and out. Hidden Power Psychic is rough, so perhaps I could also throw Lady on the team to get a Struggle Bug in there if I think I need it. Mawhile has a pretty strong set of options, but it's super slow and weak to Ground. Ground is literally my monotype, I think I'm ready to roll. Not a lot going into this particular battle, I'm sure dramatic irony won't kick in right now.

Game on!

Angela resists Extreme Speed, resists Hidden Power Flying, and is immune to Zippy Zap. A switch could happen here, but Angela already matches favorably into most of her team, at most we're getting Whimsicott here to stomach the Rock Tomb.

Nope, sorry Sally, you don't get to play this game.

Whimsicott comes out, I could actually stay and hit with Metal Claw. But since Angela is so effective, I'm going to play it safe and switch Lady into this oncoming Leech Seed or Mega Drain.


Struggle Bug will only be neutral because Fairy (for some reason) resists Bug, canceling out Grass's weakness to Bug. But it'll get the special attack drop that allows Clod to have plenty of room to enter.


Not to shabby on the damage front, Lady is basically going to sacrifice herself to neuter Whimsicott entirely.


Whimsicott is at -2 now.


I think -3 is plenty, Clod has fantastic special bulk (base 100 hp and base 130 special defense, that's massive)


Ok maybe getting Whimsicott to -3 was excessive, but look at that! This is what I'm saying, Clod has incredible special bulk. Now I do actually expect Whimsicott to retreat now, I don't think the enemy wants to tango with a 4x weakness like that. And it'll probably go to Mawile, who's immune to Poison. What I can do instead is something even more dastardly:
i'm so sorry i forgot to take the screenshot

Oh, ok. I guess not? Alright, Poison Tail it is.


Ok that's closer to what I was expecting, I suppose. We have a big lead now, so we can let Mawile get Yawned here.
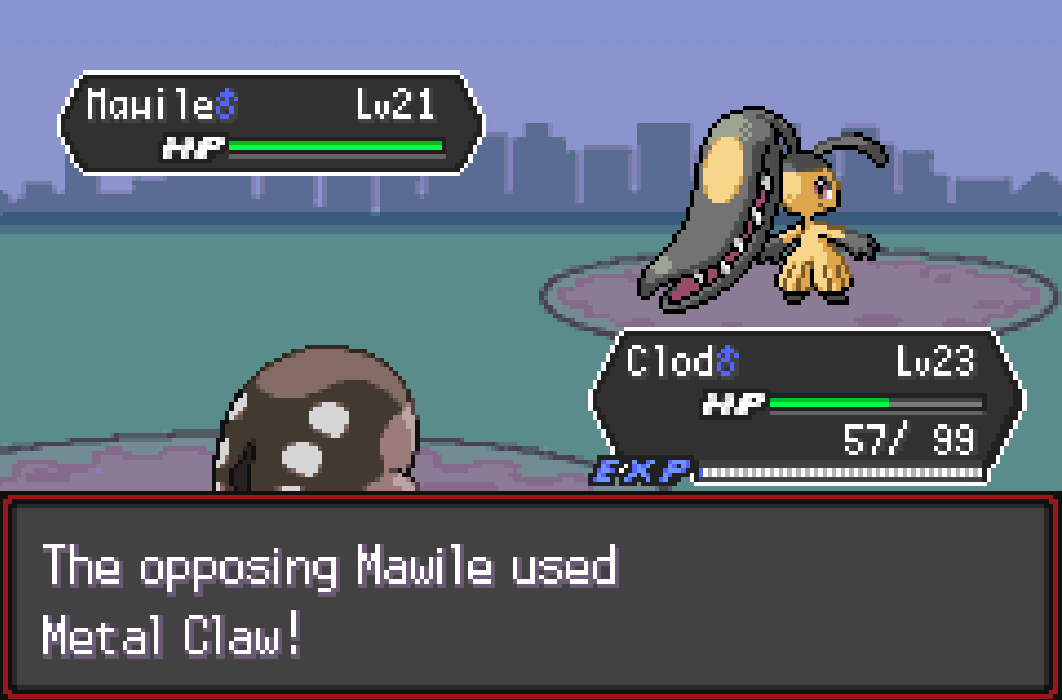


Clodsire's physical bulk isn't particularly special, so I'm surprised that did as little damage as it did. But Mawile did get the attack raise, so the fact we applied Yawn puts pressure for her to either:
- Stay in, keep the buffs, but sleep.
- Switch out, lose the buffs, dodge sleep.
sorry guys I'm really off my screengrabbing game

Mawile goes for another Metal Claw, gets another attack raise, and Rock Tomb thuds into it as expected.

This is what we were waiting for. Now I could stay in and try to power through with Mud Shot, but Clod's special attack is very low and I'd rather take the time to reset the tempo here. I'm going to swap Toad in here, for the strangely high speed stat and special attacks which hit Mawile on its weaker side. There's a nonzero chance Mawile recovers from sleep instantly and makes a move, but we have plenty of leeway here.


Ah, the double switch again. This actually isn't great for Toad, as he's weak to Air Cutter. We could go for Stun Spore to set up better, which I think I'll do. I'm playing this battle rather cautiously, but we're at a substantial advantage and I don't want to fail to some stupid oversight.


Yikes, that was big damage! But luckily Stun Spore takes, so now one enemy is asleep and the other is paralyzed. That's a bad spot for an enemy to be in. I'm just going to let Toad fall here to switch to Angela.


Mega Drain does a tiny chip of damage, and Toad goes down to Hidden Power Ghost.

Here comes Angela to ruin Sally's day.


I'm surprised Rock Tomb didn't do it in one, but we outspeed and Oricorio has no priority.

Oricorio goes down, leaving just the sleeping Mawile. Now, we're not quite guaranteed victory yet, as the Intimidate attack drop could slow down the KO, and Mawile could wake up and immediately click Fire Fang to devastating effect. But we are so far in the lead, I'm just going to take that chance.


In the end, it was nothing to worry about. Lass Sally has been defeated. Our next documented encounter is in Mt. Moon, meaning we get to progress and add to our collection a bit before then.

We grab the Teleport TM, which I don't get much use from but it's nice to have. We also have access to a Raid Den, which has its own encounter table.

I didn't play gen 8 so I don't really know what this is supposed to be.
Let's look inside:

You see we get battle partners and face like a boss version of the mon. No luck this time, we can't use a pure Normal type on our team.
Now we're at Route 4, where we find a Water Stone. None of the mons here can join our party, but we're about to hit the jackpot.
Welcome, to Mt. Moon (but imagine I said it like Jurassic Park.)

We can immediately pick up the TM for Bullet Seed, but who cares about that- we have more mons to grab!!!

-uh, maybe it was during the daytime, that's it, it's a time based thing! Ground types, here we come!

Ok, so I admit: I forgot that there weren't ten million Ground types to find here. In all seriousness, I do think we find more on different levels, but I think I was getting confused back when I was trying to do a Fighting monotype run of this game, and this cave has a lot of Fighting types for some reason. Anyhow, I can explore this cave at my leisure, the documented encounter here is super obvious when you reach it.
If you don't mind, I'm going to take my time around here.
Ok I'm back.
I found a Moon Stone, was given a Muscle Band, and caught Ludris the Baltoy!
We also catch ourselves not one, but two Teddiursa. We won't get to use them until much later, but the wait will absolutely be worth it.
We also grab Tunnels the Onix, HORSE the Mudbray, and our returning champion...

Welcome back, Calamity.
Of course, what I said at the start of the run still holds true: I suspect Calamity won't see nearly as much play, since the removal of EVs as part of RR's hardcore mode nerfs all abilities that double a stat. Part of what makes those abilities (like Sand Rush or Huge Power) is that they double invested stat points too, EVs and nature and stuff. Normally investing in a stat only makes so much of a difference, but that difference gets doubled with an ability like this. Sand Rush Excadrill outran basically everything last run, and her base speed is only 88. That's very slow in pokemon terms, not like Trick Room slow but for a pokemon meant to be a fast sweeper that's way too slow. In gen 9 even Garchomp is falling behind with base 102 speed, so you'd think 88 speed is just unacceptable. But having those EVs invested into speed also being doubled allowed Excadrill to be so wicked blazing fast that the only thing that could outrun it was like, Speed Protosynthesis Flutter Mane. That said, not all hope is lost for Calamity. Excadrill also has access to the fantastic hidden ability Mold Breaker, which allows attacks to ignore abilities like Levitate. That in itself is valuable, so maybe there is still some hope for Calamity.
Anyhow, enough reminiscing, our next encounter is against Super Nerd Miguel, fighting over which fossil we pick. I can't use either, so I'm just fighting to deprive him of whichever one he wanted more. This is also our first Double Battle, which can get pretty interesting with Ground types in the mix.
What's the enemy this time?

Oh dear, those first two are really rough. Thwackey with priority Grassy Glide and Eviolite and Fake Out is going to be hard to deal with. And instead of the easier Kantonian Voltorb, we have Voltorb-Hisui with that pesky Grass typing to resist our Ground moves (or really just to set it back to neutral).
But we didn't give up before, and we sure won't now.
One of the first things that jumps out at me is that, I think Struggle Bug is a spread move, so it can both hit and lower the special attack of Thwackey and Voltorb-H. The special attack lowering doesn't matter so much for Thwackey but it might help on Voltorb-H.
What I'm thinking right now is that I can try to Thief Thwackey's Eviolite, both making my guys tougher and reducting Thwackey's defenses. From what I can tell, this should work, I don't think Thief is prohibited in this mod, they gave me the TM for crying out loud. Angela just barely outspeeds Voltorb-H and should be neutral or resistant to all of their moves. Fake-Out is going to be a problem in general, I can bring a Ghost type and that will basically just guarantee Thwackey targets the non-Ghost with Fake-Out. Ruin is a Ghost type and has Thief, so I think Ruin will be part of our starting line. Next we're going to need someone who can benefit from or not be too torn up by getting hit with Fake-Out. I don't have anything immune to flinching sadly, but Angela does resist Normal so that could work. Bringing a Rock/Ground is out of the question since both their starting lines carry Grass coverage. Once Thwackey gets the Fake Out out of its system, Ruin will be a prime target for Knock Off, especially with that Eviolite, so it might benefit us to switch Ruin out after stealing the Eviolite. According to the calculator, Lady's Struggle Bug should hit really hard even in a double battle, and HP Ice shouldn't do too much to it. The Special Attack drop will also be nice against Voltorb-H. Starting line is going to be Ruin and Lady, Ruin clicks Thief against Thwackey, Lady gets Fake Out flinched. Voltorb's Mega Drain deals a LOT of damage against Ruin, but we only need her in for one turn to steal Thwackey's Eviolite. Then Ruin leaves and Angela comes in. For Swoobat, I'm tempted to go Clod. "But Modesty! Isn't Clod at a type disadvantage?" Yes, but Clodsire is a specially defensive menace. Without any special attack boosts, STAB super effective Psybeam is a 4HKO against Clodsire. And that's not even factoring in the Grassy Terrain Thwackey sets up, or item choices like Oran Berry healing. Clod also resists Skiddo's Brick Break and Rock Slide (although those are physical moves, which Clod isn't as well equipped against stat-wise). Granted: Swoobat will get +2 defense just from switching in thanks to its Simple ability doubling the Grassy Seed's consumption effect, so Clod by itself will have a much harder time striking back effectively. But Rock Tomb's Speed drops should also help mitigate Swoobat's base 114 speed (wow this thing is faster than I thought). Four on our team, and we have a tentative strategy building. But we need damage. With the number of Grass types on this team it's a bit difficult to manage, but I think Mantle might be useful here. Fire/Ground typing is neutral to the various Grass moves, and STAB Fire moves with burn chances can help against the various Physical attackers.
Hey wait a minute, I'm forgetting something.

We have a Moon stone. That means we can evolve one of our Nidos! Yeah, it wasn't until this point in writing that I remembered this. I'm choosing Nidoqueen for the more defensive focus. We don't have Sheer Force on her, but Makoto(F)'s base stat total of 505 is far and away the highest BST we have.
Ok I'll admit, this isn't really a "strategy" per se. But it's not nothing.

Alright, team.

Let's rock and roll!


Lady gets hit with the double tap of Fake Out and Hidden Power Ice, but she's very resilient and survives both.

Ruin uses Thief, and...
uh oh
We didn't get the Eviolite. Um.
Hmmm.
Alright. Change of plans. What can we do here.
Grassy Glide and Knock Off will both hit Ruin pretty hard, as well as Voltorb-H's HP Ice. Lady is really resilient and can probably survive a round of being fully targeted again, which will allow her to hit a Struggle Bug for both super effective damage, and for a special attack drop. Ruin has Will-O-Wisp, which I'm planning to launch at Thwackey to reduce the threat of those physical attacks, plus the chip damage won't be affected by Eviolite.


Lady is holding on valiantly, getting hit full-force by both enemies two turns in a row. Lady is seriously winning my respect this playthrough, RR Wormadam is nothing to scoff at.


Struggle Bug hits for INCREDIBLE damage on both targets, and gets us our special attack drop. Seriously, this little pizza slice is insane!

And Ruin's Will-O-Wisp lands on Thwackey.
We're in a pretty strong position here. Lady may be strong, but she probably can't survive another direct attack, so it's likely we're going to want to launch a Sucker Punch to get one last bit of damage in before she goes down. One enemy will target her, the other will target Ruin, but Ruin should ideally be able to survive at least one attack against a burned Thwackey and a -1 special attack Voltorb-H. Unfortunately, Ruin isn't exactly the best damage dealer into these two, it's not ideal. But what we can try is Magnitude, which hits all targets (it might take Lady down but an enemy would be targeting her anyways, and the way targeting works it should simply cause them to miss), and it's neutral on Voltorb even if it's resisted by Thwackey.


Ruin gets hit with priority Grassy Glide, and Wandering Soul procs to give it Thwackey's ability. But in the Hardcore mode of RR, player pokemon aren't allowed to have any of the terrain setting moves, so we get the substitute ability Self Sufficient. This is actually better for us, Ruin now has passive healing from Self Sufficient in addition to what it gets from the Grassy Terrain that's already set.


Lady hits a pretty strong Sucker Punch, and Voltorb-H hits back with Hidden Power Ice, but Lady survives! Goodness gracious, this pizza slice refuses to die!
Unfortunately Ruin will actually be cutting that short.

...and also fails to take the KO on Voltorb. That's unfortunate. But who do we send out next? We can hit Voltorb-H with a priority Shadow Sneak as long as Thwackey doesn't KO Ruin with another Grassy Glide, but we can't really control for that, it's just likely to happen. I'm thinking Mantle comes in to hit some big special fire moves. There's a non-zero chance Voltorb goes for the Self-Destruct this turn because it's on low health, so we're going to want Shadow Sneak to KO. Although even if it doesn't, Ruin is immune thanks to Ghost typing, so we're only down one mon, and Thwackey would also definitely go down, so we'd just be back to even. In fact, I'm tempted to let that happen. Mantle has Lava Plume to hit two targets, but if we think Voltorb is going down then I might as well Ember instead to just hit Thwackey to make absolute sure it's going down if Voltorb explodes.


Shadow Sneak gets the KO, Thwackey opts for Knock Off on Mantle to remove Wise Glasses, and Ember doesn't do a whole lot of anything.

Sableye comes in to replace Voltorb-H. Sableye outspeeds Ruin and will probably KO with Foul Play, so we can try to launch a Shadow Sneak to ensure the KO. It might also be nice to double focus on Thwackey instead to guarantee a Shadow Sneak + Ember combo takes it down for good, but we'd lose our Self Sufficient by hitting it with a physical move to trade Wandering Soul back to our side. All things considered, Ember should 100% get the KO on Thwackey right now, so I'm going to go Shadow Sneak. We might fall to a Grassy Glide before Shadow Sneak goes off, but either way Ember will take out Thwackey, leaving us neutral at worst.


Grassy Glide hits Mantle for decent damage, Sableye hits priority Will-O-Wisp to gut Ruin's offense, Shadow Sneak deals barely any damage even on a crit, and Mantle sends Thwackey off with one more Ember.
Skiddo comes out to replace Thwackey, and Skiddo has Rock Slide, which I'm not a big fan of seeing. It's faster than me and Rock Slide has the infamous Flinch chance associated. But we can still do something here. I'm going to go for Will-O-Wisp with Ruin, and Lava Plume with Mantle. Lava Plume will hit Ruin but Ruin is already burned so there's no concern about that (and the damage is whatever, we're still ahead). It should hit big damage on Skiddo since Grass Pelt only boosts physical defense, and burning Sableye wouldn't be too bad since it'd help counteract Leftovers healing.


Rock Slide does some big damage, no flinches but Sableye takes Ruin out with Foul Play. Lava Plume hits for huge damage though, and burns Sableye.
I'm sending Clod onto the field. If Mantle survives long enough to hit another Lava Plume, Clod will be supremely unbothered by it thanks to its impressive special bulk. Sableye Foul Play might not be great for it, but Clod resists or is neutral to Skiddo's options.


Sableye hits Will-O-Wisp on Clod, Skiddo's Rock Slide hits for some more, but Mantle's Lava Plume sneds Skiddo packing and really hurts Sableye. Clod's Poison Tail doesn't do much to Sableye, but it's here to be bulky, not put up damage numbers.

In comes Swoobat, and right now Clod isn't looking as reliable a counter as it was on paper, but we're at such a good advantage it doesn't really matter.
Clod is going to Yawn at Swoobat to inflict Sleep, and Mantle is going to click Ember again since that's its current strongest option.


Sableye Protects, and Swoobat uses Calm Mind. I was hoping the enemy wouldn't opt for the setup move here, but I should've known better. With Simple, Calm Mind goes from a +1 Special Attack +1 Special Defense to +2 to each, which is a ludicrous setup turn. That's Nasty Plot and Amnesia in one turn. Luckily, Mantle's Lava Plume crits, which bypasses defense boosts, but we're still not looking great overall. Clod's Yawn is going to be really nice here, putting Swoobat to sleep will buy us a good amount of time. Clod is going to Mud Shot at Sableye and Mantle is going to Lava Plume again, hopefully we can get Sableye off the field quickly so we can make it a 2v1 against Swoobat.


Sableye uses Recover and Swoobat downs Mantle with an Air Cutter. Clod's Mud Shot deals barely anything except a speed drop, but now Swoobat is asleep. This is where we try to hit, and hit hard. We do have the problem that Sableye can priority Will-O-Wisp to gut our physical attackers, so I'm going to want to account for this if I can. Clodsire can fire off Rock Tombs at Swoobat to drop its speed stat, so it would benefit me to bring out something to answer Sableye right now if I can. That means our best answer right now is Angela (i think, we actually don't have a great way to hit Sableye).
Sucker Punch won't work if it clicks anything except Foul Play, so I can't use that, and Bulldoze hits all targets (which hurts me more than it helps, Swoobat is immune thanks to Flying typing and a Physical Ground move hurts Clod a lot). I'm going with Metal Claw, the STAB bonus should help, and an Attack raise could help offset the burn damage reduction.


Sableye's Will-O-Wisp misses, which is really nice. Angela's Metal Claw deals alright damage, Clod's Rock Tomb does minimal but it gets the speed drop. And because of Simple, it's actually twice as effective, since negative stat changes are also amplified by Simple. We're going to do the same thing as last round.


Will-O-Wisp connects, but Metal Claw still does really good damage. Another Rock Tomb officially puts Swoobat's speed in the trash, Angela already comfortably outsped after the double drop. Now both mons are going to point Rock Tomb at Swoobat.


Sableye goes for Recover, but Angela and Clod working together bring Swoobat down. Now it's the 2v1 we asked for. Although, I'm not exactly thrilled about who's left. This is going to turn into an annoying battle. I'm going to speed through it a bit. Basically: Clod is going to spam special Mud Shot, and Angela is going to keep spamming Metal Claw going for an attack buff.

About 6 rounds later, after getting the Attack boost, Angela and Clod are able to put Sableye down. Thus, the battle is ours.

The guy offers to share the fossils, but I actually can't use either of them, since neither is a Ground type.

So I'm going to take the Helix Fossil, so he can't have it >:)
Alright, so what next? There's one more important fight in Mt. Moon, which is against Archer of Team Rocket. This one isn't easy, so it'll take preparation. We don't even get that much more time to prepare, it takes place almost instantly after our last battle, to the point where I almost started it before I was ready.
So what's his deal?

The first thing that stands out to me is two Shuca Berries, which I as a Ground type enthusiast know is the berry that halves the damage of an incoming super effective Ground type attack. Seviper also has a new ability added in RR called Fatal Precision, which makes it so super-effective moves can't miss and have their damage boosted by 20%. Yikes. It also has Hypnosis, which I don't love to see. Glimmet has Toxic Debris, which might become a problem if I don't have an answer for it. Luckily, it only procs on being hit with a physical attack, so if I use a special attacker to answer it I'll be alright. My other advantage here is that, unlike most other special trainers here (whose Pokemon are usually my level minus one), most of his are minus 2 or minus 3. So we do have a brute force advantage here.
- For Glimmet, I'm going Boss the Sandile. Unnerve will stop Glimmet from eating the Shuca berry, and Boss outspeeds so Bulldoze should OHKO. It will set Toxic Spikes on my side of the field, but I just need to bring a Poison type so it can soak up the spikes by switching in.
- Speaking of, Clod is a no-brainer against Houndour, it can tank its special damage with ease.
- Speaking of ease, Mole outspeeds everyone easily and has super effective Rock Blast, which has a better chance to take out Fearow in one turn. It also lacks the weakness to Bulldoze, Incinerate, and Drill Run that Angela would have (although it does become weak to Mega Drain and Ice Fang).
- I'm also going to bring in Ludris the Baltoy as another Seviper answer, because its STAB super effective Psybeam doesn't proc Shuca Berry. Also I'm pretty sure Ludris hasn't had a chance to be on the team yet, and I want to see it in action.
Honestly, I feel like this alone will already be enough to win the battle, but we can bring some insurance. Jimothy the Marshtomp and Lady the Wormadam will be our backup answers in case something goes wrong, they're very reliable.
Alright, let's give this a whirl.

Try me, old man.

Immediately Boss's Bulldoze OHKOs Glimmet. Toxic Debris does go up, but we planned for that.

Fearow comes out to greet me. We have Rock Throw we can use to chip on some damage, Boss has already done her job so everything now is extra credit.


Fearow's Double Hit does monstrous damage, Technician + Muscle Band + STAB is no joke. I don't really have a way to outspeed here, so Boss will go down to allow safe passage for another.


That "another" being Mole, the only mon on my team that outspeeds Fearow's 57 speed stat. Impressively fast, but I can do better. We do get hit with Toxic Spikes, which puts Mole on a clock. But I like my odds here.

Rock Blast takes Fearow out in only 2 hits.

Mightyena comes out, who can hit us with super effective Ice Fang. But we're still at a numbers advantage, so Mole can Bulldoze for whatever damage it does.


I may have been a bit cocky there, I thought Mole would survive that. But no matter, we're still in a good position. Jimothy can come out since Bulldoze dropped Mightyena's speed and hit with a strong Brine. We do again get hit with Toxic Spikes, which I honestly keep forgetting are here.


After Berry Juice and Oran Berry the health stats are still looking good, but I'm still not a huge fan of how little Brine dealt. I was hoping it'd keep Mightyena in the orange so it could deal double damage next turn, it might instead be better for me to click Bulldoze to take advantage of my higher Attack stat (I'm being very scatterbrained this fight, I don't know why I thought Brine would be the better attack option when I have Jimothy's nature as Adamant).


I can definitely get the KO with Bulldoze next turn, but Jimothy is going to go down to poison once that happens.


So we choose our mon before the enemy does, I'm going to send Clod in to clear the Toxic Spikes.

Clod vs Seviper, this is good for us. Seviper is going to aim for super effective Bulldoze on us, but we can switch to Ludris - who is immune to Ground.


Or that can happen, sure. I really don't like that. This fight actually might not go well. Right now, Seviper is likely going to aim for Mega Drain, so we can switch to Clod, who will stomach it beautifully.


Ok that seems absurd. Ludris is immune to Bulldoze, why would he click Bulldoze if not to predict an incoming Clod? At least Clod actually took it like a champ, for a physical move boosted by an ability that was actually not that bad. I won't lie, it's stuff like this that makes me feel like the enemy cheats a bit, the fact it went for Bulldoze feels like it waited to read my input and then chose the best move based on that.
But that's okay, we're better than that.
Seviper could put us to sleep again here, which would be really unfortunate. That said, given how little damage Bulldoze did to me, I'm clicking Yawn to put Seviper to sleep.


Another Bulldoze puts Clod in danger, but we landed our Yawn. I'm going to switch to Ludris, we might dodge another Bulldoze or get hit with Mega Drain, but either way the important thing is we get closer to Ludris waking up while Seviper is asleep.


Perfect! Ludris is in and now both mons are asleep. Now I'm going to click Psybeam hoping Ludris wakes up before Seviper does.
Turn 1: They're both asleep.

Turn 2: Ludris is still asleep, Archer switches Seviper out for Houndour. We definitely want to pull Ludris back now, Houndour is immune to Psybeam and hits Snarl, which I'm pretty sure drops special attack in addition to being super effective against Ludris. I'm actually going to go to Lady here, she's always way tankier than I'm ever expecting. Snarl sould do not too much, we will get hit with Incinerate next turn but we can start hitting Struggle Bug to drop Houndour's special attacks.


I won't lie, Nasty Plot boosted Incinerate might just OHKO Lady. In fact, according to the damage calculator, it's a 75% chance to OHKO. From the calculator, none of this looks good for me, a Nasty Plot boost is a lot. I'm going to click Struggle Bug on the very slim chance Lady doesn't die to Incinerate, because it could help reduce that insane special power.

Nope, Lady isn't immortal.
I'm sending Clod out next hoping to hit Rock Tomb, for good damage and for a speed drop.


WOW, okay, um... alright, I suppose this is something...
+4 Special Attack Houndour is basically the grim reaper now, and it all comes down to speed. At -1, its speed stat is now 30, which is still faster than Clod, but slower than Ludris. At this point I have to let Clod fall to Houndour, then pray that Ludris wakes up turn 1. That's really my only path to victory here.


This is so tense, it's all down to Ludris. If Ludris wakes up, we hit an Ancient Power to seal Houndour's fate. No Omniboost chance, but Seviper is still asleep, giving us a chance to strike first and take it down. If we don't wake up... it's all over.
Here it goes.


My Ground types have never failed me before, and they're not failing me now!

Seviper comes in, and we're in a fantastic ending position here. Ludris can attack with Psybeam, which should take us home.

So it didn't do as much as I was hoping for, but we're still in a good spot. Seviper is faster, so there's a chance it wakes up and hits us with Hypnosis, which would be a really dissappointing end to all this. But I believe in my team.


It went for the Hypnosis, I'm starting to get worried. But it missed, and we got our Psybeam. I don't have a priority move, so it all comes down to this last round. Seviper might just hit a Hypnosis and then we have to hope we wake up faster than it can Mega Drain us, which would have to be really fast since its Mega Drain will deal over half our health. But if we can land one more shot, we win.


And Ludris avoids the second Hypnosis, sealing the game!

A shameful blunder indeed.
And with that, we've cleared all the major encounters in Mt. Moon.

And our level cap increases! I love when this happens!
Anyways, this post is getting long enough, so I won't narrate us getting out of the cave. What we do get, is we get to Cerulean City! Which I will go into more detail on in the next post.